
If your kid is curious about photography, or if you, as a parent, is interested in giving this point & shoot exercise some extra meaning, what you need to do is to guide your kid – teach them the basics, explain how the camera operates and provide feedback on their technique and photos. This will make a difference: your kids will improve their skills, and all of you will enjoy this time together.
So how do you teach your kids photography? Where and how should you start? These are great questions that we are about to answer. Before we dive into the tips, two important things:
- At the end of day, it’s how you spend time with your kids, and not necessarily the knowledge they get out of it that matters. Keep that in mind!
- Just talking about cameras and photography is not enough. Engaging your kid by taking the right approach. If you're not sure how to start, read our recent post: Teaching Photography to Kids - Selecting the Right Approach
How to Teach Kids Photography - 11 Tips
1. Purchasing a Camera and a Case
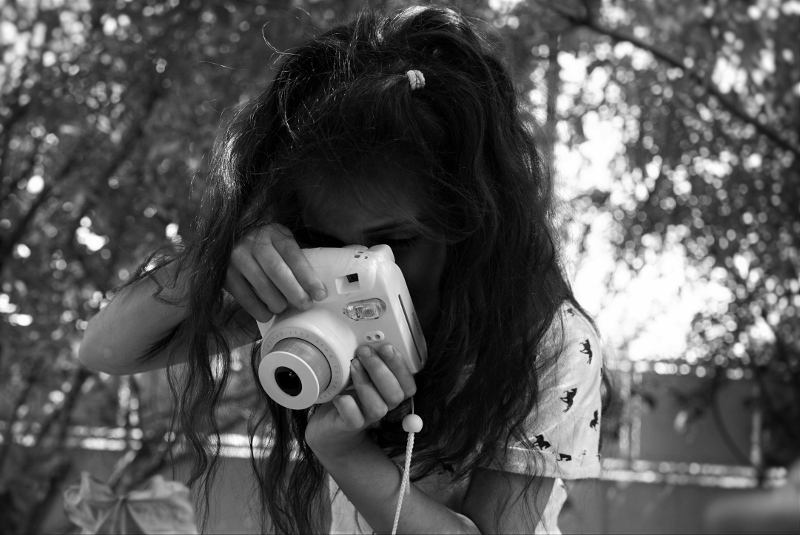
The cost of cameras has declined in the last decade, but it’s still a fairly costly purchase and not something to be taken lightly. You don't need to run out and spend a lot of money each time your kid is excited about a photo he or she had taken with your iPhone, but teaching kids photography when your kids have their own camera – regardless of if it’s a toy camera, a digital camera or a polaroid camera – is a different experience for both of you. Additionally, it will be much easier and intuitive for them to take ownership over this journey.
It's also recommended to purchase a camera case. If your child is going to take a lot of pictures, they need to be able to take the camera with them, without you or them worrying about damaging it.
2. Watch Your Stuff, Kid!
Regardless of cameras becoming affordable, they do cost money. As a parent, it is your duty to teach your child the value of a dollar. The first step of doing so is teaching them how to handle their camera (note – if your kid is already familiar with the camera they are using – skip this tip).
Teach your kid to wear the strap
Start by explaining how and where to hold it. Note that most toy and other kid cameras have a dedicated place for your kid’s fingers.
Continue with the strap. Teach your kid (and show him by doing it yourself) to always wear the strap around their neck or wrist before using. If the camera’s lens has a cover – teach your kid to take it off only before shooting and to put back shortly after the photography session is completed. If the camera has a case, teach your kid to take the camera out only when shooting is about to begin and to return it to the case shortly afterwards.
If you’re using a polaroid camera of any kind, guide your kid not to touch the photo with their fingertips until it is fully processed.
3. Basic Camera Parts
Show your kid the basic parts of the camera, and explain their purpose and main functionality. Start with the power switch, body, lens, shutter release button and the view finder / LCD display. Later on, and according to your kid’s patience and attention, continue with the flash, mode dial, zoom control and other control buttons.
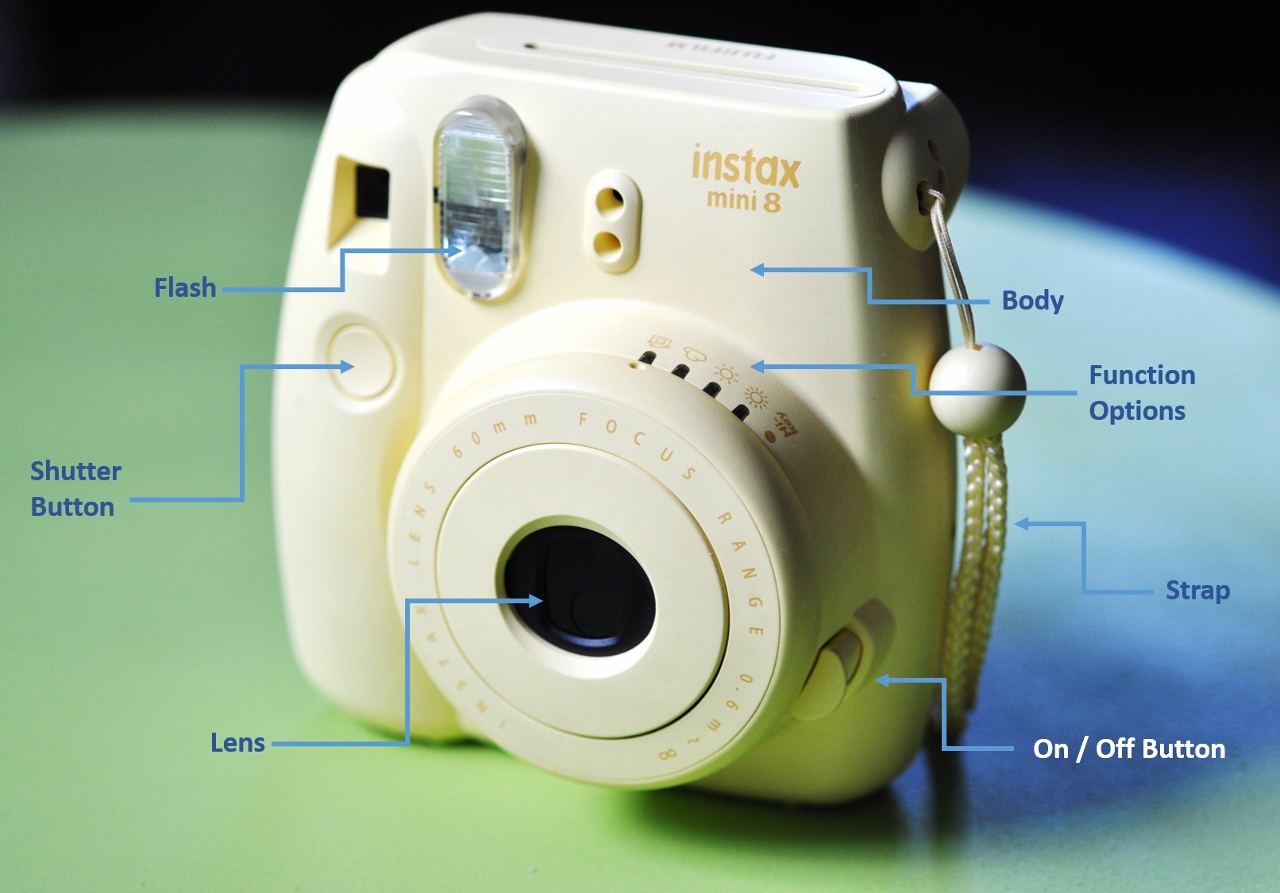
The main components of a FujiFilm Instax camera
For more details and explanations about the basic camera parts, click on my previous post: Basic Photography Terms For Kids and Beginners
4. Holding and Steadying the Camera
Blurry photos are very common among beginners or kids who are taking their first photos. And it is easy to get frustrated by that. Why are the photos blurry? You can read more here, but generally – it’s because the camera moved when the shutter was opened.
There are a few things you should teach your kid in order to minimize blurriness:
First
hold the camera steady with both hands. One hand is used to hold and stabilize the camera, while the other one does the same plus pressing the shutter button. Each camera has its own designated places to hold it. Some cameras even have grips, so if you have them – use them.
Second
guide your kid to hold the camera close to their body. Preferably, hold the camera when both elbows are leaned against your chest or side of your body. By that, you are letting your body act as a solid base. If necessary, lean your body against a wall. It will further improve the camera’s steadiness.
Third
following the former tip, you can ask your kid to place their elbows on a table or any other surface, especially if the camera is too heavy for them, and / or if it takes them a lot of time to focus and take the shot (very common among kids and beginners).
It should be mentioned that a tripod is also a great tool to avoid blurriness, but for kids which are making their first steps in photography, I wouldn’t recommend using it at this time.
5. Focal Lock
One important and useful technique for kids to learn is how to use focal lock (in case your camera has this feature). While in most cases cameras do well in auto focusing on subjects, there are times when your kid’s photography session will end up with out of focus photos, because the camera doesn’t know what the main subject is. This may be the case particularly if they are placing subjects off center with the rule of thirds.
Guide your kid how to use the auto-focus function:
- Press the shutter halfway down to focus on the subject they’ve picked
- Frame the shot while still holding it down
- Press the shutter and shoot the photo.
6. Begin Experimenting
Taking lots of images is a great way to practice and learn different techniques of photography. Encourage your kid to experiment both with their camera and with the fun of photo shooting:
Camera
Encourage your kid to try it. Hold it. Feel it. It’s weight and size. Your kid will feel much more energized if he or she feels comfortable with their camera. Encourage your kid to experiment his camera with all its features and functions. Doing this with the tips mentioned above will provide both of you a variety of opportunities for feedback and learning, both about the kid camera you’re using and on photography.
Photo Shooting
Nowadays, photos cost is zero (unless your kid is using a Polaroid camera). So encourage your kid to try it and take many photos, and mainly – not to take the same picture all the time, but to make changes as suggested below:
- Change angles.
- Shoot from different perspectives: down up, high low.
- Get closer and or step back for a wider angle photo.
- And any other idea you can think of.
One Important Note
don’t exaggerate by letting your kid take more and more photos without proper guidance and control. Do it for practice, not for any other reason. Our purpose is to teach kids photography and enjoy, while taking advantage of the low cost of photos, but not to spend time in an endless “point and shoot” exercise.
7. Check Your Backgrounds
How many times have you seen a picture where the object blended into the background? Like someone wearing a black shirt standing in front of a dark wall… or people smiling to the camera when something is growing out of their heads?
In order to avoid these mistakes, checking the background and the foreground of a shot is required. Teach your kid to quickly scan the background and the foreground of an image, and look for clutter, distraction or any other fault that might ruin the photo. If necessary, the framing should be changed.
8. Get in Close
One of the common characteristics of the pictures kids take, including my daughter, is that the subject is somewhere off into the distance. Kids, maybe because they are trying to capture too many things at the same time, do that quite often. So pay attention to that, and encourage your kid to get closer if necessary – a picture of a single, clear and vivid subject may be better than a picture of many subjects which are lost in the overall scene.
Guide your kid to get closer to the subject. If your kid’s camera includes a zoom, you can use it of course, but at the beginning, I’d recommend for them to use their legs.
9. Lighting
Light plays a significant role in photo quality. The light’s origin, light’s intensity and the light direction are the most important factors, and the correct use of these factors can make the difference between a great photo and a poor one.
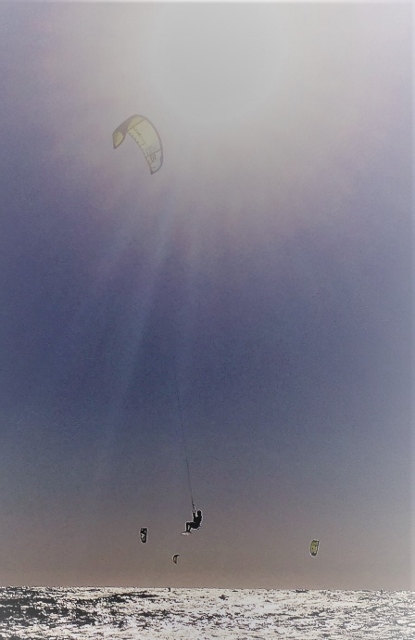
The picture above was taken facing the sun, which is a somewhat more advanced technique. For kids and beginners, it is recommended to firstly learn to take pictures while the sun is behind them
Ask your kid to look around them – where is the light coming from? The sun? A window? A naked bulb? Then look at the subject – is it lighted or placed in a dark place? And therefore – will the image be dark or lighted?
The most important rule to tell your kid about is never to take images when the light is directed to the camera (as my Dad used to tell me when I was a little kid – "the sun should always be at your back...").
One more lesson to teach your kid is how to position their subject or themselves in order to ensure the light is effecting the image as your kid wishes.
10. Teach Them the Difference Between People, Objects and Places
Different subjects require different kind of attention. The way you photograph a person is quite different from the way you photograph an object or place.
What kids do quite often is to focus solely on one group – if you’d give them a camera they will get back to you with 100 pictures of trees, or buildings, or their friends, rather than shooting a variety of subjects.
If you see your child doing this – encourage them to open up to all kinds of objects.
11. Focus on a Single Subject
Many distractions may occur to a photo. Teach your kid to avoid them, using the following techniques before hitting the shutter button:
- Select a single subject per photo.
- Fill the Frame – a very common tip for kids and beginners. Make sure that the subject fills the frame to remove distraction.
- Consider lighting and shooting angle. Once your kid is all set – shoot.